16 KiB
Boot Module (ogboot)
The ogboot module is responsible for managing the network boot process for OpenGnsys clients, using the iPXE system. This component serves the necessary binaries for booting (such as undionly.kpxe or ipxe.efi), manages the ogLive operating system, and generates custom boot instructions for each client based on their configuration.
Its main features include:
-
Managing ogLive versions (install, delete, set as default).
-
Generating custom boot instructions per client through reusable templates.
-
Exposing ogLive files (kernel and initialization image) via HTTP for client boot.
The boot architecture is determined by both the client configuration parameters, parameters inherited from their Organizational Unit, and detection performed by the DHCP server (ogDHCP) based on the client's architecture.
ogboot Module Status
From the top menu, you can access the Global Status panel, which shows the current status of ogboot.
In this view you can check:
-
Reserved disk usage for ogLive and boot files.
-
Status of critical services (tftpboot and nginx).
-
List of installed ogLive images, with their kernel, architecture, and version.
ogLive Management
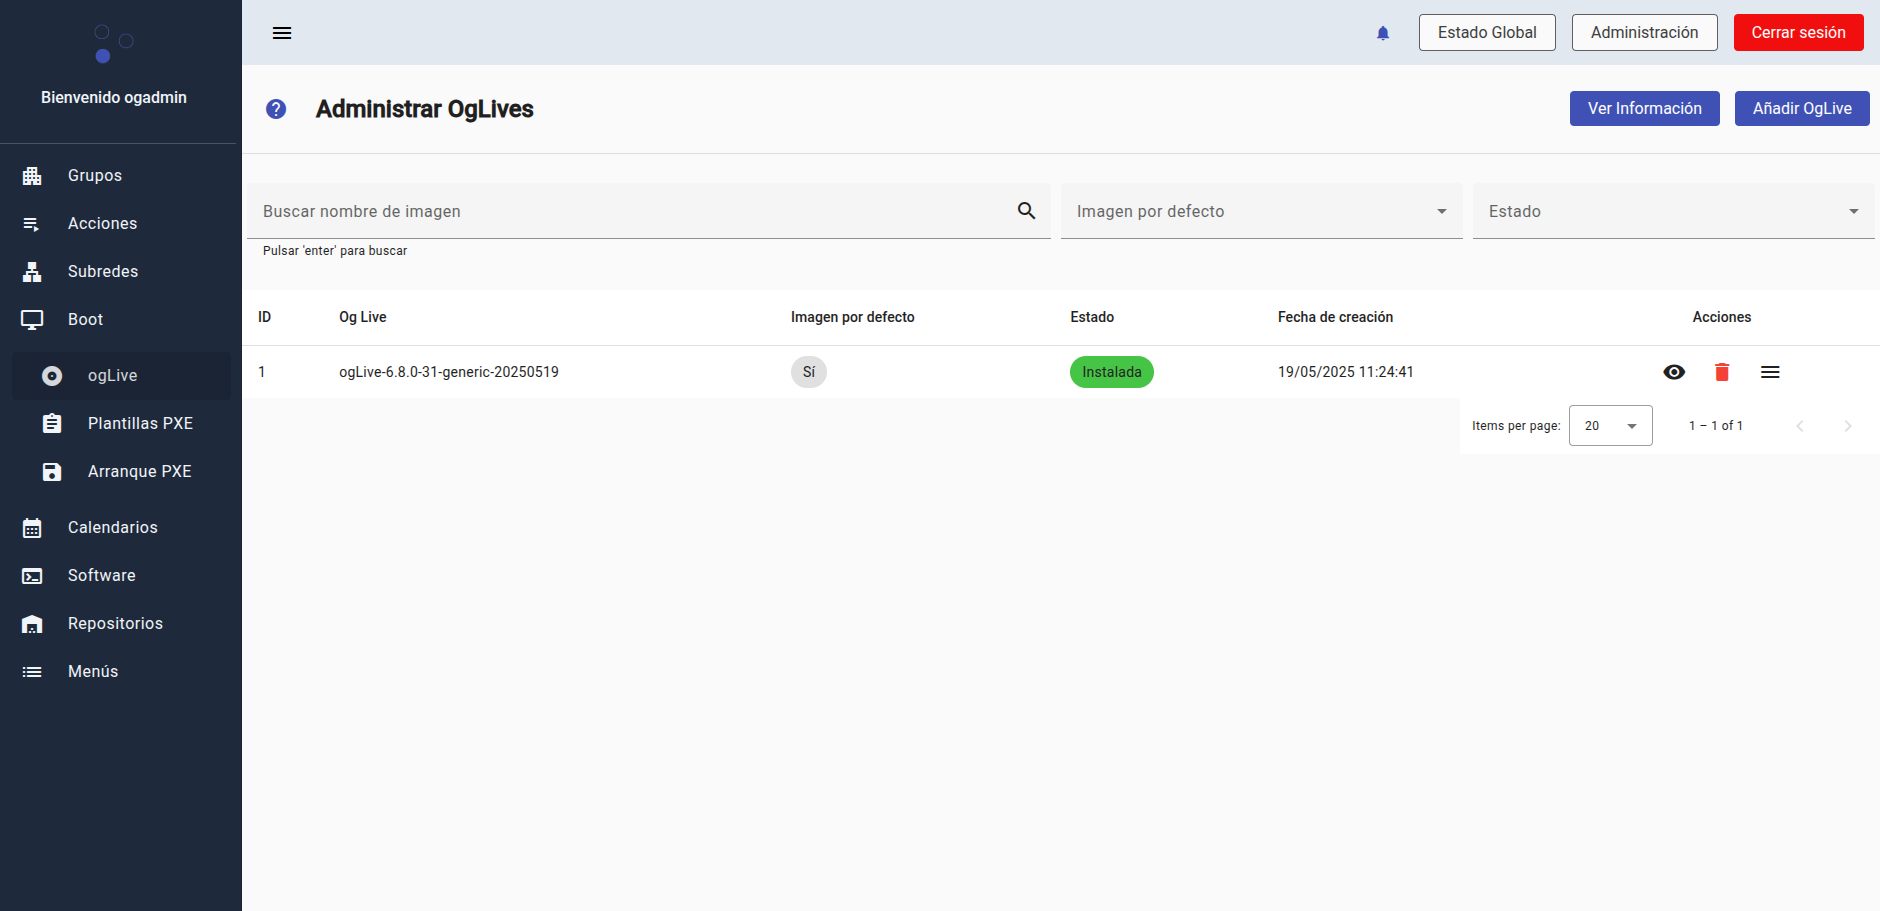
From the lateral ogLive section, it is possible to manage the different versions of the operating system that will be offered to clients when booting.
Each entry shows:
-
Image name (e.g., ogLive-6.8.0-31-generic-20250519)
-
Whether it's marked as the default image
-
Installation status
-
Creation date
Actions: view details, delete, or change the default image
!!! warning "Warning" Only one ogLive image can be marked as default. This will be the one used in boot templates when no specific version is specified. It is not possible to delete an image marked as default.
Adding and installing a new ogLive image
To add a new ogLive version to the system, follow these steps from the lateral ogLive menu:
- Click the "Add OgLive" button to select one of the images detected in the system.
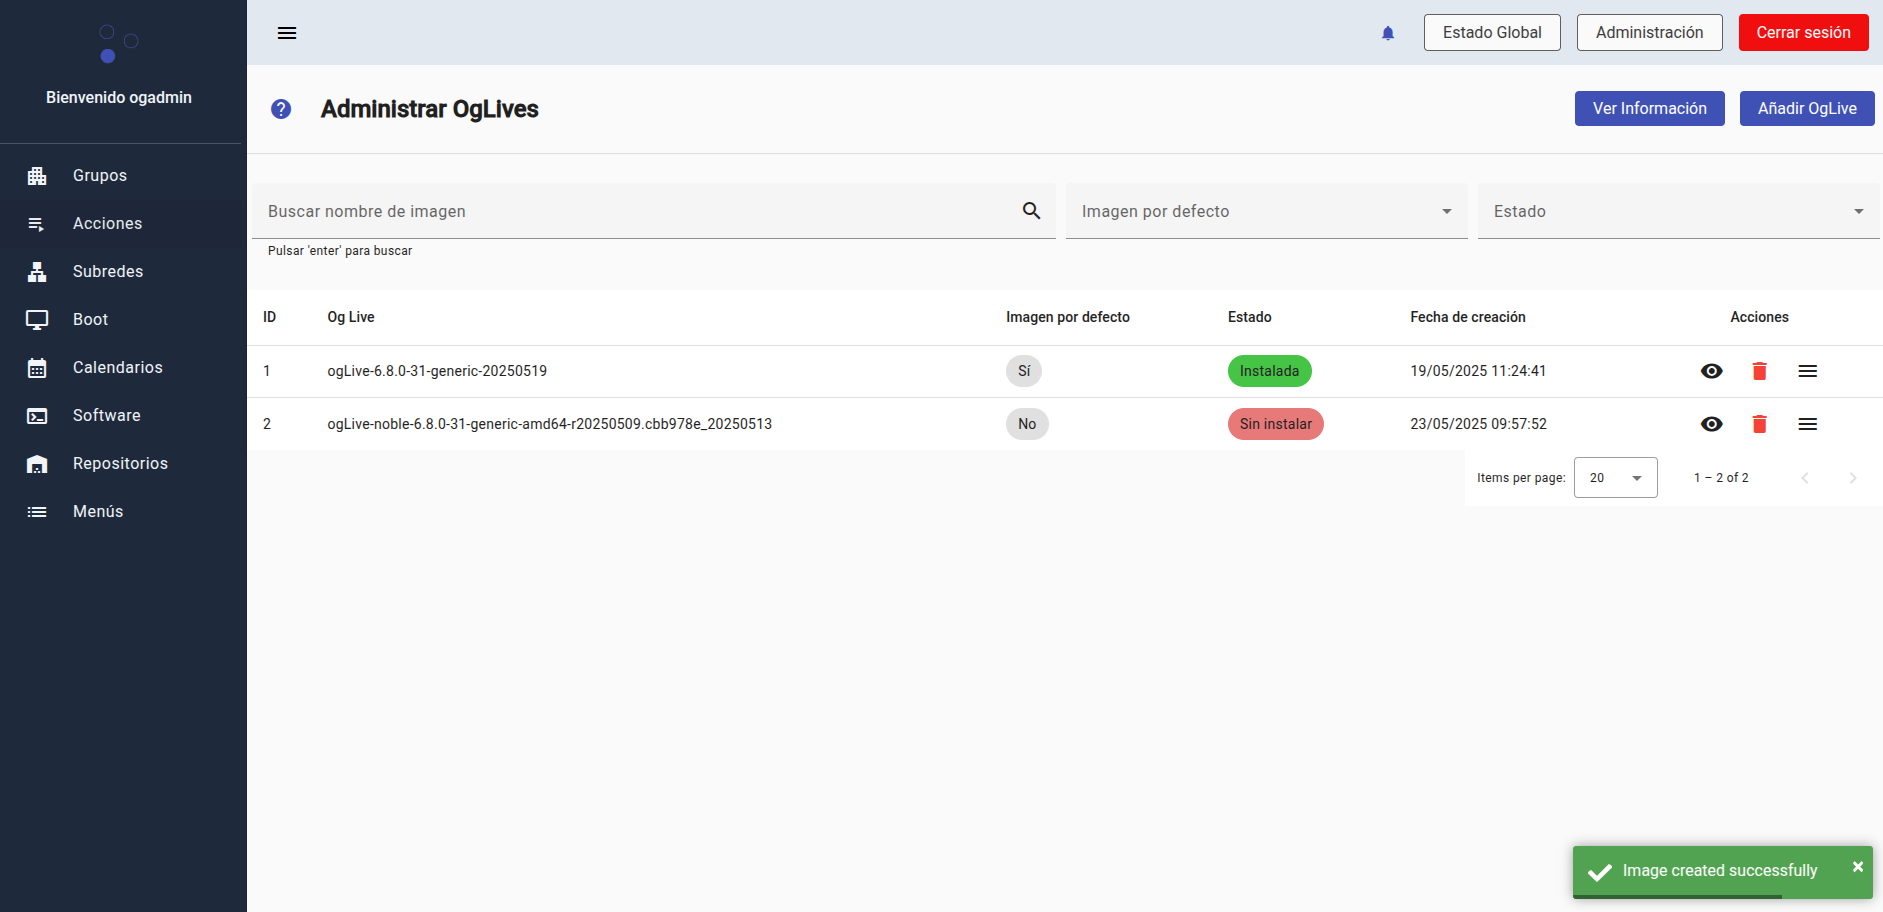
- A window will open with a dropdown list of available images that are not yet registered in the interface. Select one of the available ogLives and press "Add".
- Once added, the image will appear in the list with "Not installed" status.
From here you can view it, delete it, or deploy the actions menu to proceed with its installation.
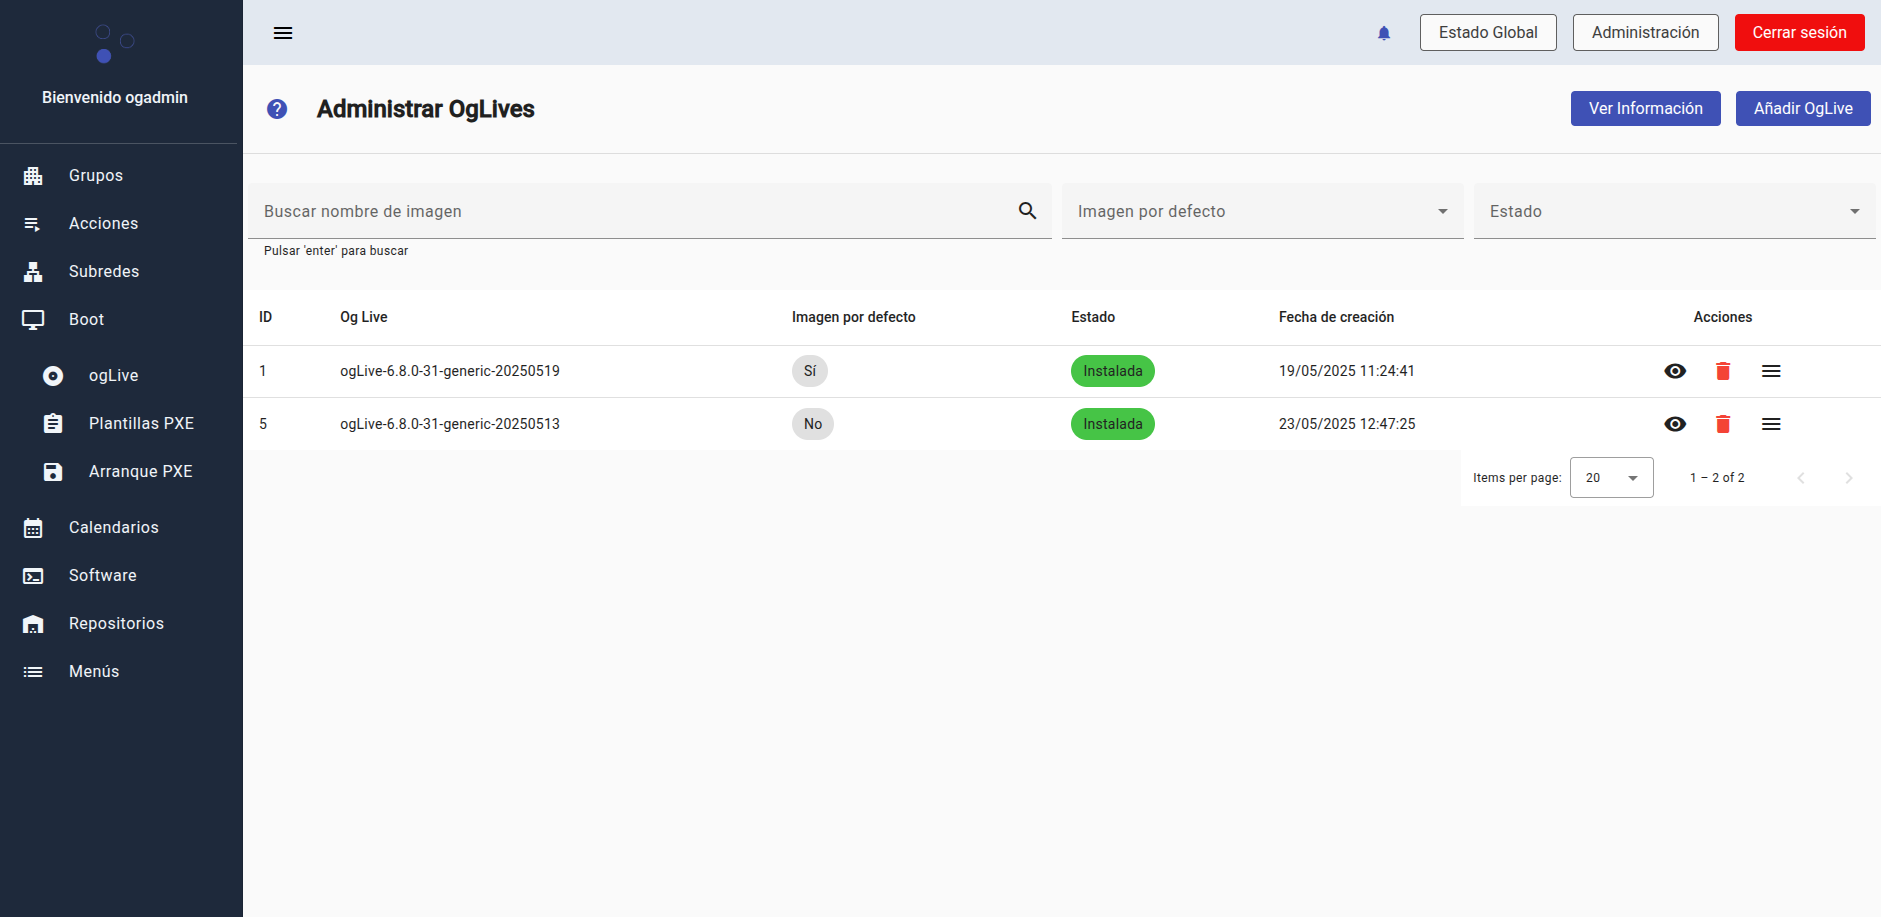
- Install ogLive image Click on the actions icon (≡) and select "Install".
This will start the installation process, which will register the image and prepare it to be used during client boot.
- Once the process is complete, the status will change to "Installed" and the image will be ready for use.
!!! note "Note" You can mark the new image as default if you want it to be used automatically in boot templates that don't specify a specific version.
PXE Template Management
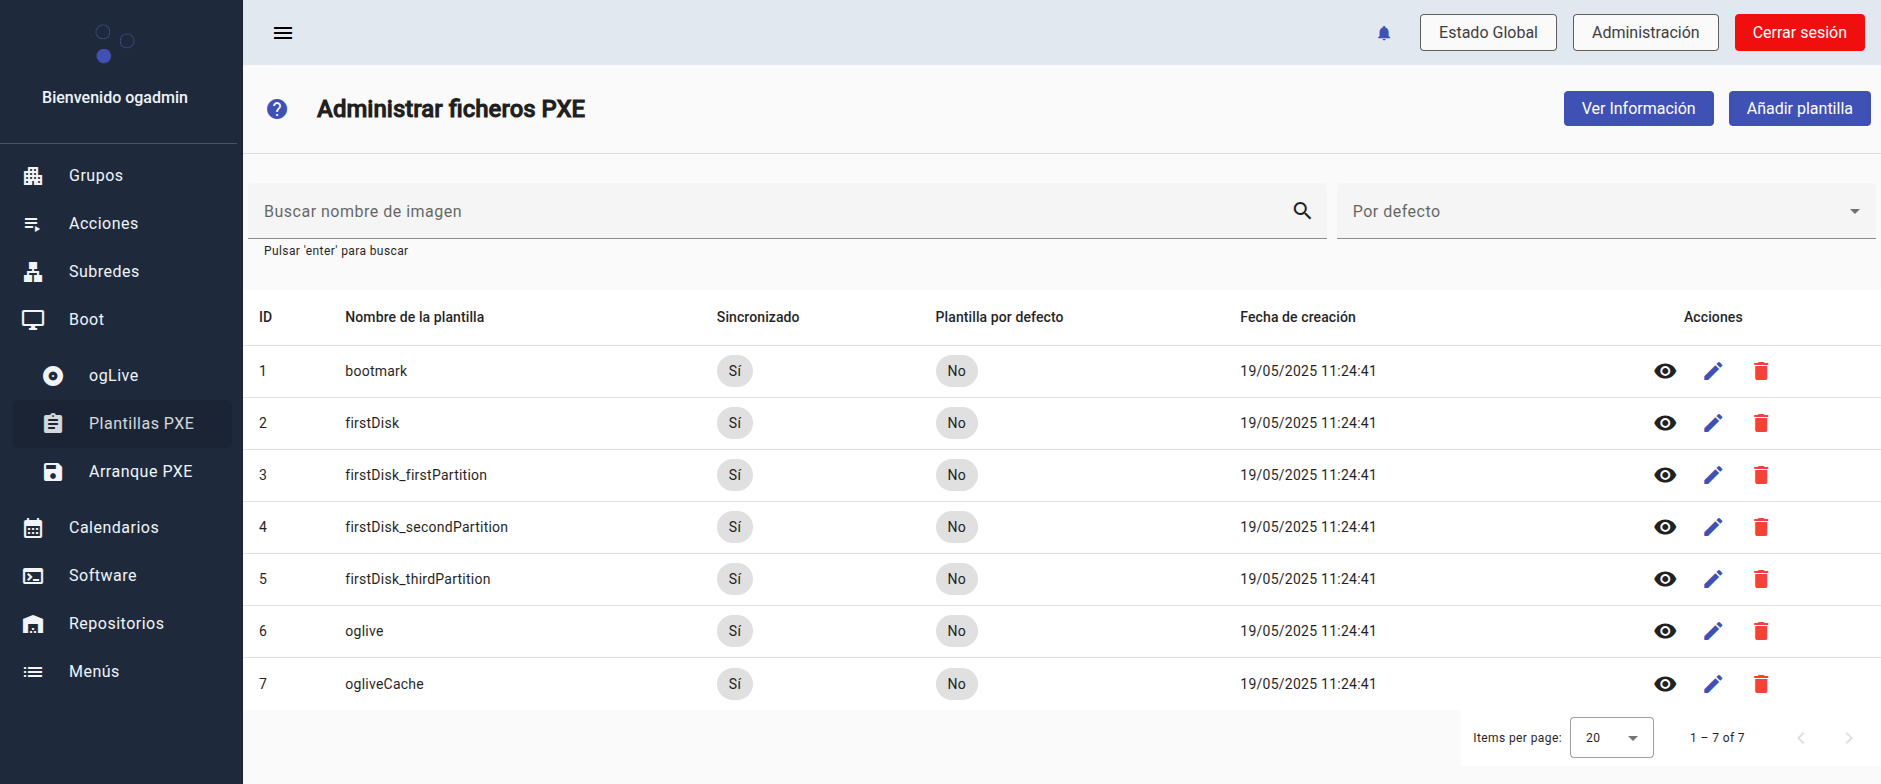
From the lateral PXE Templates menu, you access the management of base files that define how each client will boot. These templates are used to generate files customized by MAC address and allow selecting the boot method that the equipment should use.
This view shows:
-
Template name
-
Synchronization status with the file system
-
Whether it's the default template
-
Creation date
-
Available actions: view, edit, or delete
Default available templates
The system comes with several predefined templates located at:
/opt/opengnsys/ogboot/tftpboot/ipxe_scripts/templates/
The default templates are:
| Template | Description |
|---|---|
| firstDisk | Boots from the system's first disk |
| firstDisk_firstPartition | Boots from the first partition of the first disk |
| firstDisk_secondPartition | Boots from the second partition of the first disk |
| firstDisk_thirdPartition | Boots from the third partition of the first disk |
| oglive | Boots the ogLive system from network (HTTP) |
| ogliveCache | Boots ogLive from the client's local cache (/opt/opengnsys/cache/oglive/) |
These templates are used as a base to generate files customized per client, replacing the variables contained in them with specific values based on the equipment configuration.
PXE template variables
The boot templates available in ogboot contain variables that will be automatically substituted when generating the custom boot file for each client. This allows reusing generic templates for multiple computers, dynamically adapting the values.
Example template: oglive
#!ipxe
set timeout
set timeout-style hidden

set ISODIR __OGLIVE__
set default 0
set kernelargs __INFOHOST__

:try_iso
kernel http://__SERVERIP__/tftpboot/${ISODIR}/ogvmlinuz ${kernelargs} || goto fallback
initrd http://__SERVERIP__/tftpboot/${ISODIR}/oginitrd.img
boot

:fallback
echo "OgLive default"
set ISODIR ogLive
kernel http://__SERVERIP__/tftpboot/${ISODIR}/ogvmlinuz ${kernelargs}
initrd http://__SERVERIP__/tftpboot/${ISODIR}/oginitrd.img
boot
Available variables
| Variable | Description |
|---|---|
| SERVERIP | ogboot server IP address (HTTP/TFTP server hosting the ogLive) |
| OGLIVE | Name of the directory where the selected ogLive image is mounted |
| INFOHOST | Set of kernel parameters customized for the client (IP, hostname, ogcore, ogrepo, etc.) |
These variables are automatically substituted when the boot file for a client (for example, 01-00:11:22:33:44:11) is generated from the selected template.
In PXE templates used by ogboot, the INFOHOST variable is automatically substituted with a string of kernel parameters. These parameters are generated by the ogcore component from the client configuration and its Organizational Unit.
- Substitution example
set kernelargs ro boot=oginit quiet splash irqpoll acpi=on og2nd=sqfs ogprotocol=smb ogactiveadmin=true ogdebug=true ogtmpfs=15 oglivedir=${ISODIR} LANG=es_ES.UTF-8 ip=192.168.3.11:172.17.8.35:192.168.3.1:255.255.255.0:PC11:eth0:none group=Aula_Ciencias ogrepo=172.17.8.35 ogcore=192.168.2.2 oglive=172.17.8.35 oglog=192.168.68.51 ogshare=172.17.8.35 ogprof=false hardprofile=default ogdns=192.168.3.1 vga=791
- Parameter details
| Parameter | Origin and function |
|---|---|
| ip= | Client IP address along with network configuration, in the format:<client-ip>:<server-ip>:<gateway>:<netmask>:<hostname>:<device>:<autoconf> |
| ├── client-ip | IP address assigned to the client |
| ├── server-ip | ogboot server IP address (TFTP/HTTP server) |
| ├── gateway | Subnet router IP |
| ├── netmask | Network mask |
| ├── hostname | Client name (PC11, for example) |
| ├── device | Network interface (e.g., eth0) |
| └── autoconf | IP configuration method (none, dhcp, etc.) |
| oglivedir | Name of the ogLive directory to be used |
| ogcore | ogcore server IP |
| oglive | ogboot server IP (where the ogLives are located) |
| ogrepo | Image repository server IP |
| oglog | oglog server IP (centralized logs) |
| ogshare | IP address for shared storage |
| group | Client's Organizational Unit name |
| hardprofile | Client hardware profile (default if none assigned) |
| ogdns | DNS server IP |
| ogntp | NTP server IP (if defined) |
| ogProxy | Proxy address (if applicable) |
| netiface | Network interface (e.g., eth0) |
| LANG | Language (es_ES.UTF-8) |
| vga=791 | Screen resolution |
| Other common parameters | ro boot=oginit quiet splash irqpoll acpi=on og2nd=sqfs ogprotocol=smb ogtmpfs=15 |
Creating a new PXE template
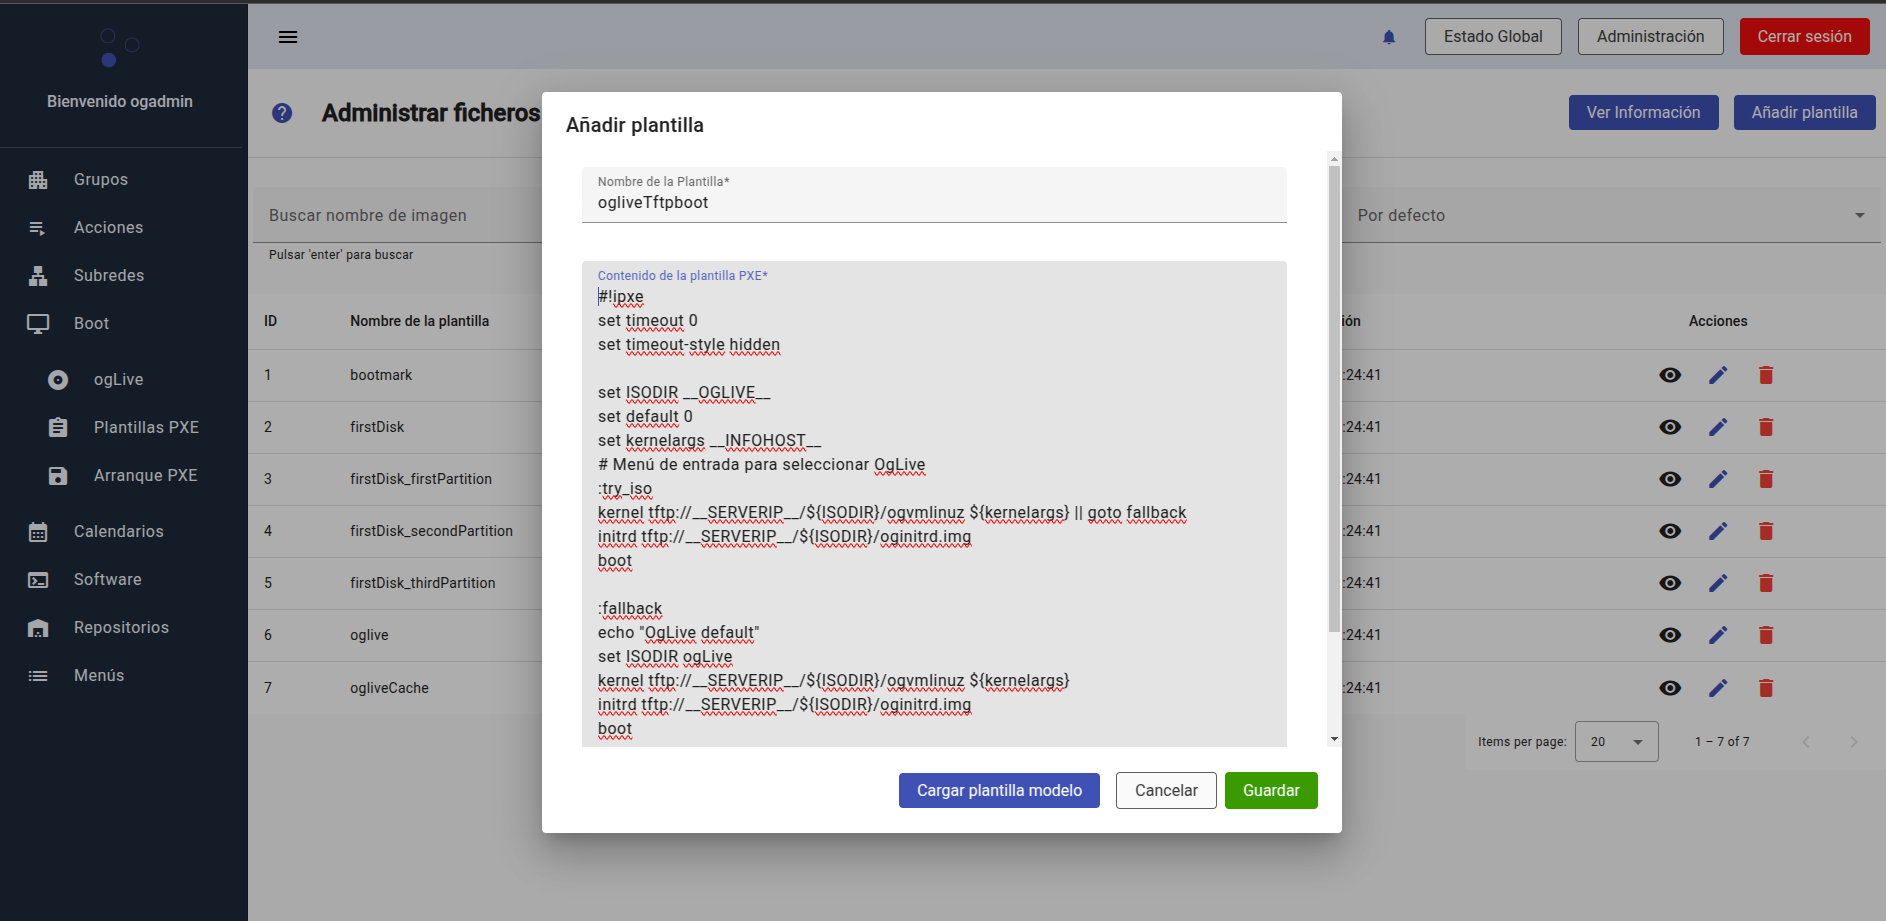
The ogboot module allows adding new PXE templates from the graphical interface, either starting from scratch or using one of the predefined models.
-
To add a new template:
-
Access the lateral PXE Templates menu
-
Click "Add template"
-
Fill out the form that opens
Template models
The interface allows loading a base model by clicking the "Load template model" button, which will insert one of the two available models into the editor:
- ogLive model (HTTP or TFTP network boot) This model is designed to boot ogLive from an HTTP or TFTP server. It uses the SERVERIP, OGLIVE, and INFOHOST variables, which will be automatically substituted by ogboot when generating the custom file.
#!ipxe
    set timeout 0
    set timeout-style hidden
    set ISODIR __OGLIVE__
    set default 0
    set kernelargs __INFOHOST__
    :try_iso
    kernel http://__SERVERIP__/tftpboot/${ISODIR}/ogvmlinuz ${kernelargs} || goto fallback
    initrd http://__SERVERIP__/tftpboot/${ISODIR}/oginitrd.img
    boot

    :fallback
    set ISODIR ogLive
    kernel http://__SERVERIP__/tftpboot/${ISODIR}/ogvmlinuz ${kernelargs}
    initrd http://__SERVERIP__/tftpboot/${ISODIR}/oginitrd.img
    boot
- Disk boot model This second model detects whether the system is in BIOS or UEFI mode and boots from the first available disk, using grub.exe or grubx64.efi.
#!ipxe
iseq ${platform} efi && goto uefi_boot || goto bios_boot

:bios_boot
echo "Running in BIOS mode - Booting first disk"
chain http://__SERVERIP__/tftpboot/grub.exe --config-file="title FirstHardDisk;chainloader (hd0)+1;rootnoverify (hd0);boot" || echo "Failed to boot in BIOS mode"
exit

:uefi_boot
echo "Running in UEFI mode - Booting first disk"
sanboot --no-describe --drive 0 --filename \EFI\grub\Boot\grubx64.efi || echo "Failed to boot in UEFI mode"
exit
!!! note "Note" These models are editable and serve as a base to define other more complex variants (for example, boot by specific partition or recovery modes).
Viewing template content
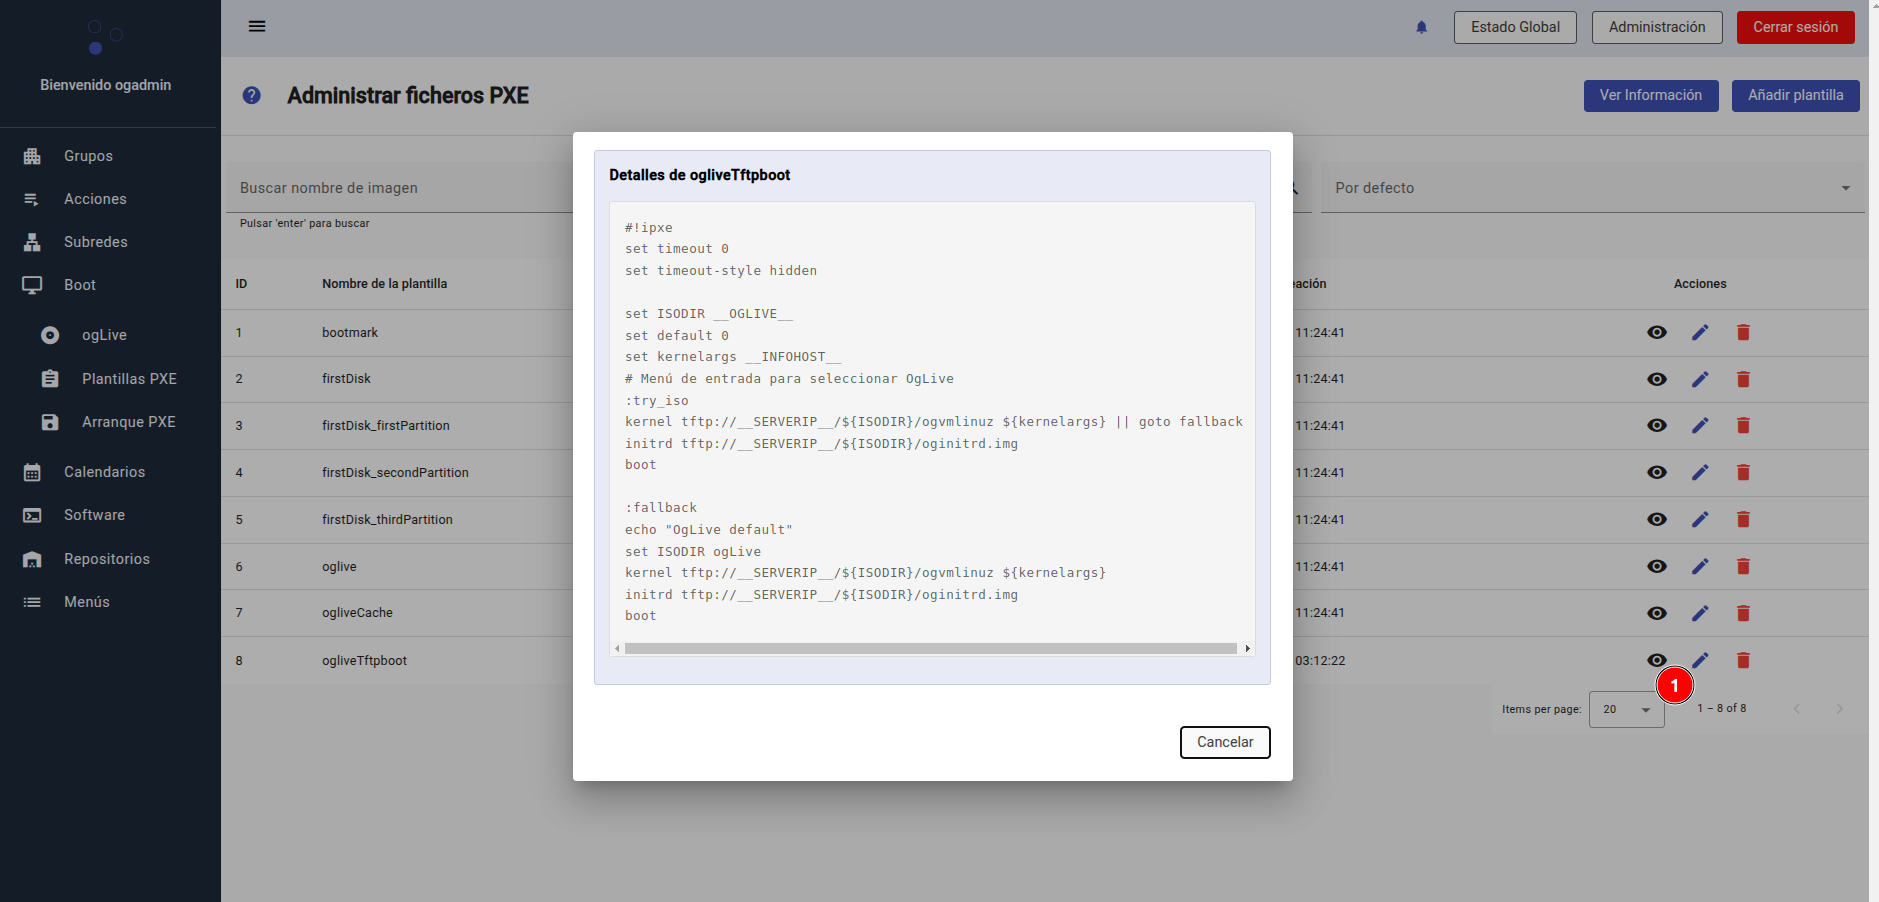
Click the eye icon to view the complete content of a PXE template.
Editing an existing template
Click the pencil icon to edit the name or content of the template. The editor will open with the current content preloaded.
Deleting a template
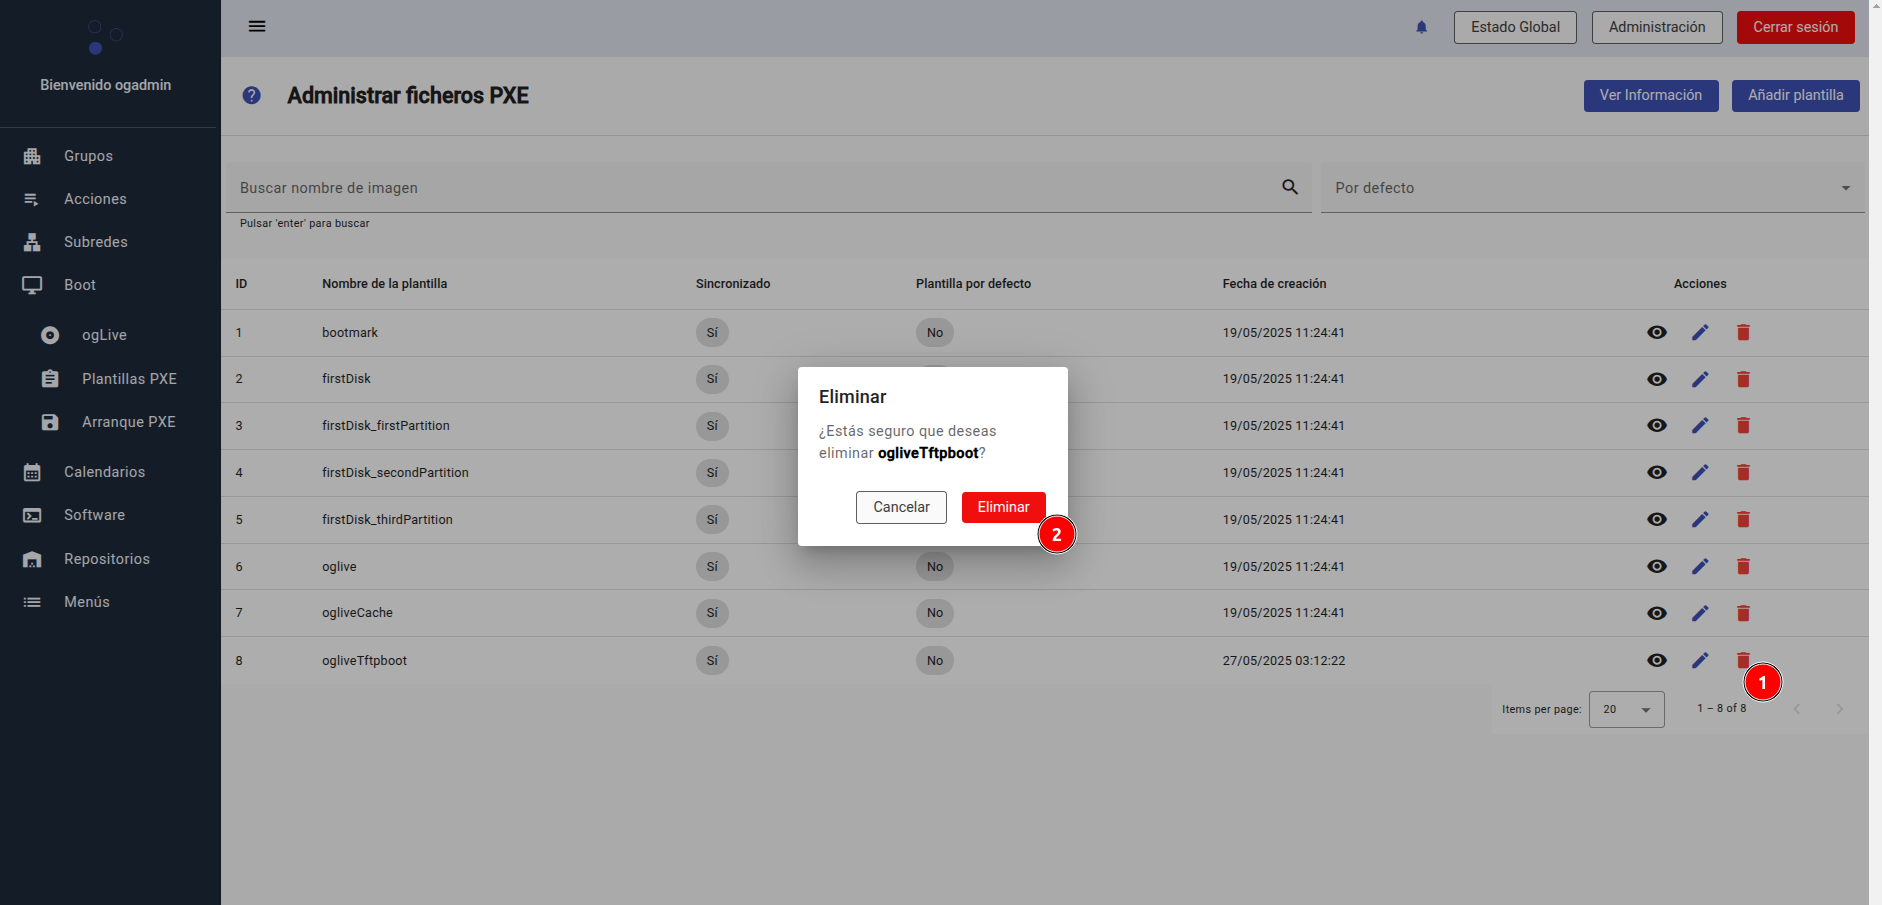
Click the trash icon and confirm deletion to remove the template from the system.
Client Templates (Boot PXE)
Each client can have a specific boot file assigned based on a template. These files are named 01- and stored in /opt/opengnsys/ogboot/tftpboot/ipxe_scripts/.
Assigning template to a client
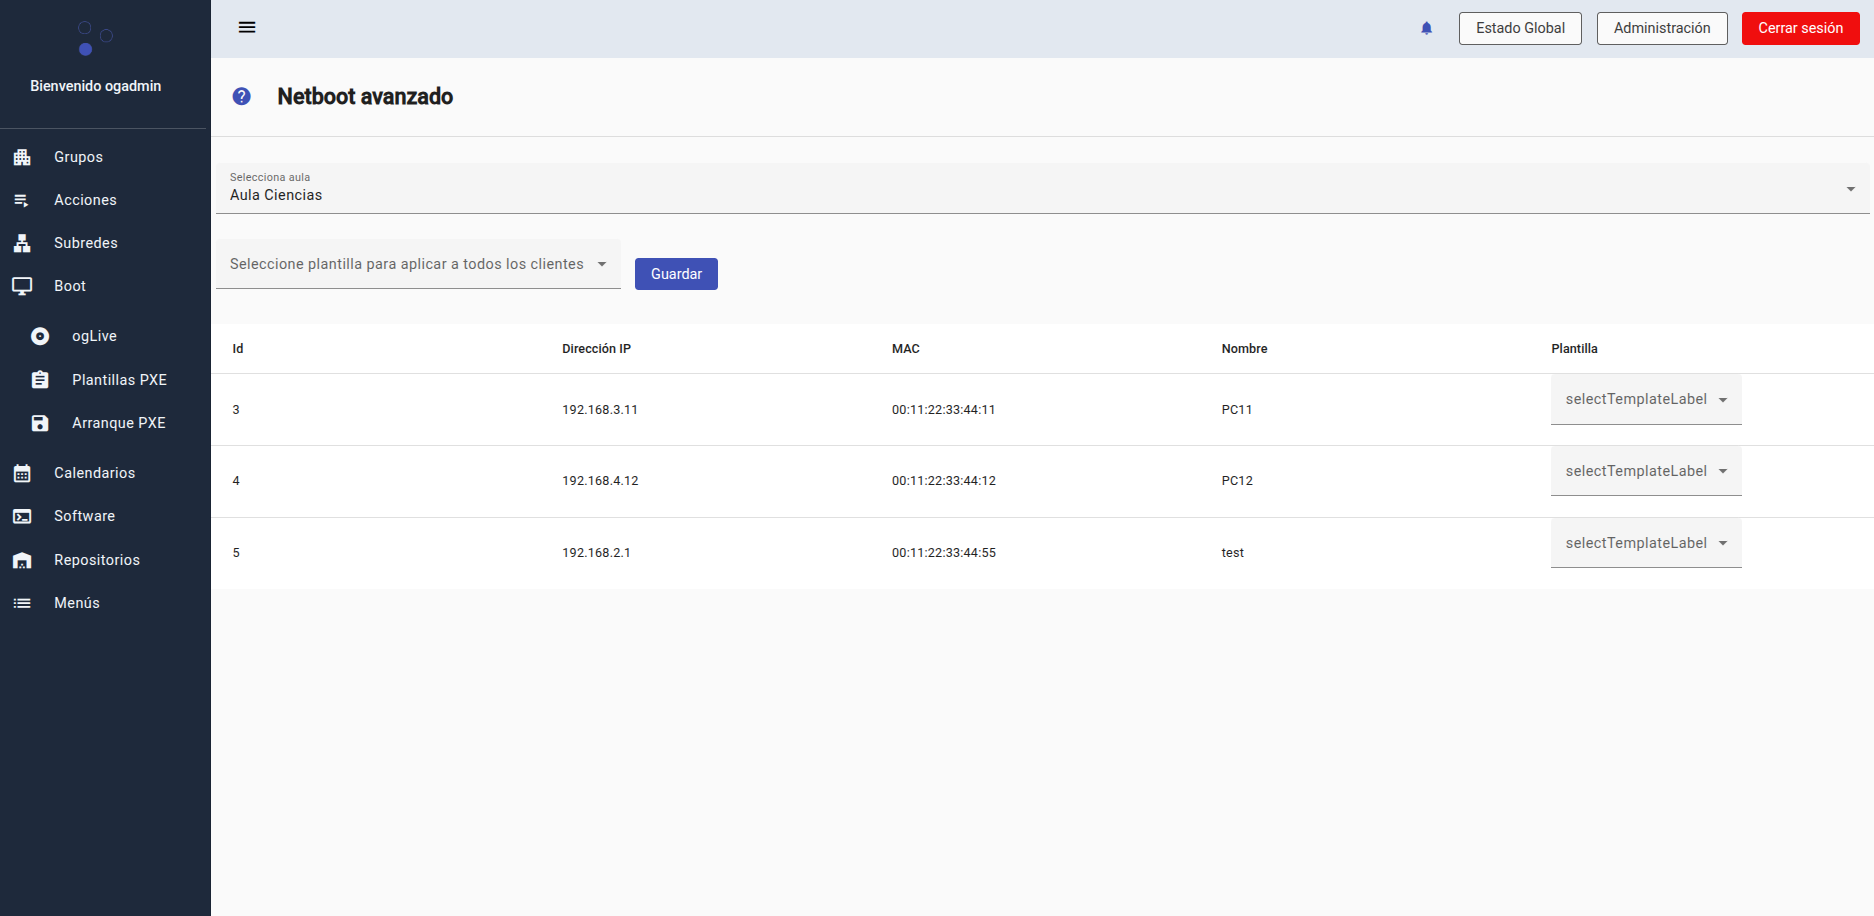
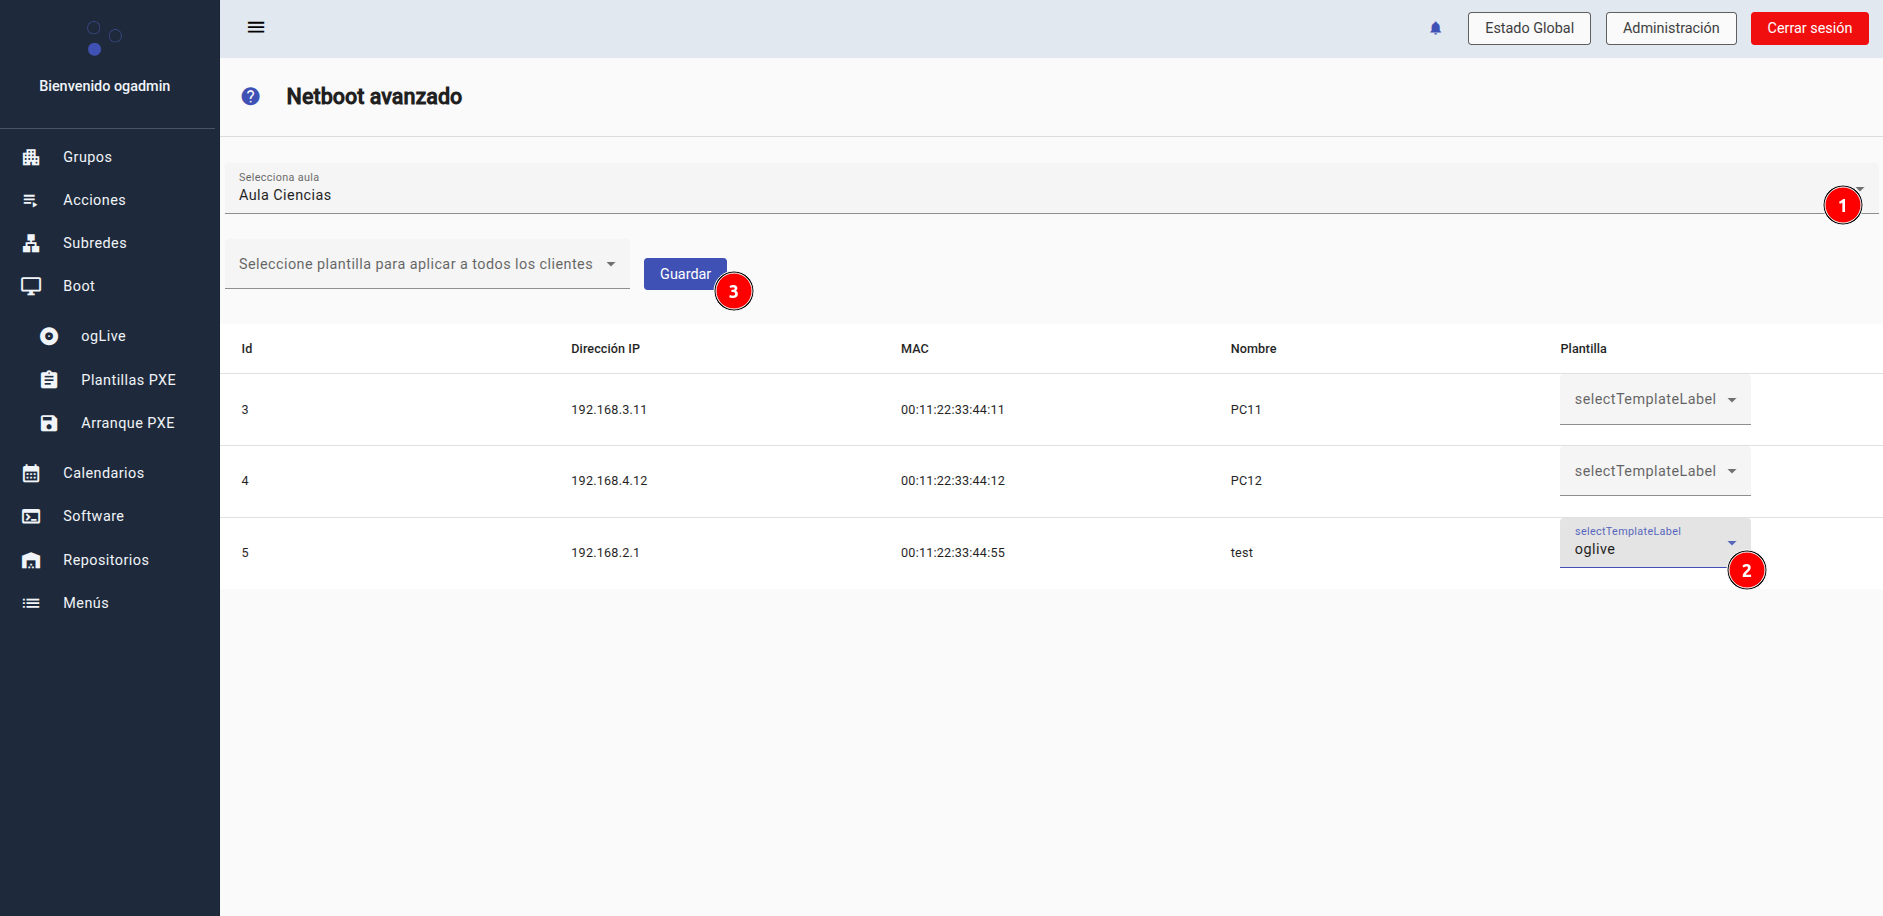
From the lateral menu, access PXE Boot, where you can see all clients in an Organizational Unit (for example, "Aula Ciencias"):
- Select a template for each client from the Template column.
!!! note "Note" You can also apply a template to all clients using the top dropdown.
- Click Save to generate the corresponding boot files.
These files are created with the name 01- (for example, 01-00:11:22:33:44:55) and stored in:
/opt/opengnsys/ogboot/tftpboot/ipxe_scripts/
The content of the generated file will be a copy of the corresponding template with variables substituted by the specific client values: IP address, ogLive, ogcore, etc.
!!! success "What we have learned" - What we have learned 1 - What we have learned 2 - What we have learned ...
